| View previous topic :: View next topic |
| Author |
Message |
spotter23
Joined: 26 Feb 2018
Posts: 75
|
 Posted: Tue Jul 30, 2019 8:48 pm Post subject: Oldsmobile Aerotech Monogram Kit Posted: Tue Jul 30, 2019 8:48 pm Post subject: Oldsmobile Aerotech Monogram Kit |
 |
|
Anyone on the forum ever built the Oldsmobile Aerotech kit?
If so any suggestions on paint, photos, tips or suggestions?
Thanks
MG |
|
| Back to top |
|
 |
john843
Joined: 28 Jan 2018
Posts: 607
Location: S.C. Lowcountry
|
|
| Back to top |
|
|
Rob Spires
Board Moderator
Joined: 27 Jan 2018
Posts: 185
|
| Posted: Sun Aug 04, 2019 6:46 pm Post subject: |
|
|
I started one about six months ago, but put it down when I ran into some issues. I plan on picking it back up again soon.
I will say, be careful to glue the two chassis halves together as straight as possible. It will be tough to level it out and make the underside look smooth if you dont. Dont ask me how I know... lol |
|
| Back to top |
|
|
spotter23
Joined: 26 Feb 2018
Posts: 75
|
| Posted: Tue Aug 06, 2019 8:55 am Post subject: Olsmobile Aerotech Monogram Kit |
|
|
thanks for the info....
John the link you posted doesn't work, please try again if you don't mind
Thanks
MG |
|
| Back to top |
|
|
john843
Joined: 28 Jan 2018
Posts: 607
Location: S.C. Lowcountry
|
| Posted: Tue Aug 06, 2019 12:51 pm Post subject: |
|
|
Mark, I'm not sure what the problem is but every time I click on the link in the post, it comes up. You might try googling "Fine Scale Modeling forum Oldsmobile AeroTech Longtail 1:24th scale model by Monogram models" I'll try it again:
http://cs.finescale.com/fsm/modeling_subjects/f/4/p/178603/2011039.aspx
John |
|
| Back to top |
|
|
spotter23
Joined: 26 Feb 2018
Posts: 75
|
| Posted: Wed Aug 07, 2019 7:37 pm Post subject: |
|
|
The link works, thank you, must have been on my end somehow
Thanks again
MG |
|
| Back to top |
|
|
Rob Spires
Board Moderator
Joined: 27 Jan 2018
Posts: 185
|
| Posted: Mon Aug 19, 2019 6:10 pm Post subject: |
|
|
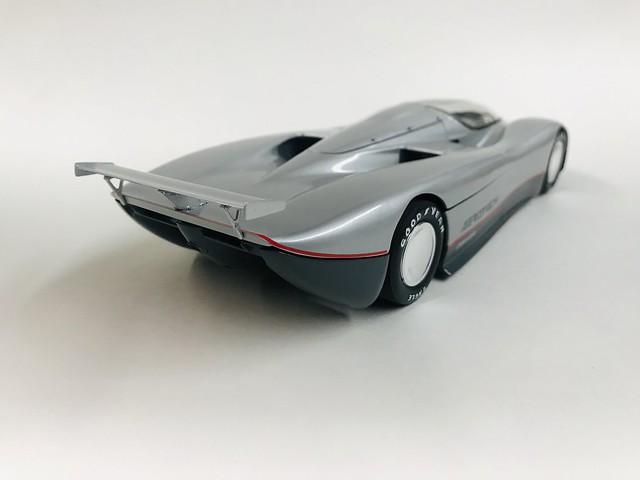
| This one is back on my bench now. Did you have any specific questions? I plan on using Tamiya X-11 Chrome Silver and X-10 Gunmetal for the body. |
|
| Back to top |
|
|
jbherri2
Joined: 30 Jan 2018
Posts: 213
Location: Lost! In Space ...
|
| Posted: Fri Sep 20, 2019 12:47 pm Post subject: |
|
|
| I've built the kit. The parts fit is pretty decent, but take extra care with the channel shaped pieces that are in front of and behind the radiators. Mine turned out decent, although I had trouble lining up the dark/light silver/gray around the nose. I think I used Testor's Graphite Dust and Diamond Dust. Probably too much metal flake, but I liked it. |
|
| Back to top |
|
|
jbherri2
Joined: 30 Jan 2018
Posts: 213
Location: Lost! In Space ...
|
|
| Back to top |
|
|
Rob Spires
Board Moderator
Joined: 27 Jan 2018
Posts: 185
|
| Posted: Fri Sep 20, 2019 5:47 pm Post subject: |
|
|
| I think it looks great! Did you do work on the nose seam where the body and chassis come together? If not, its hidden well. The only way I can see to putty that seam is work on it after the body is finished, meaning Ill have to mask and respray... |
|
| Back to top |
|
|
jbherri2
Joined: 30 Jan 2018
Posts: 213
Location: Lost! In Space ...
|
| Posted: Fri Sep 20, 2019 6:08 pm Post subject: |
|
|
If I recall correctly, I did use filler (super glue, probably) on the nose seam. And yes, it can only be done once the front of the body is put on. If you're clever, you may be able to hide the seam somewhat with the color demarcation line. I don't consider myself that clever.  |
|
| Back to top |
|
|
spotter23
Joined: 26 Feb 2018
Posts: 75
|
|
| Back to top |
|
|
jbherri2
Joined: 30 Jan 2018
Posts: 213
Location: Lost! In Space ...
|
| Posted: Tue Oct 15, 2019 3:35 pm Post subject: |
|
|
| Oh, that looks really sharp! |
|
| Back to top |
|
|
|