| View previous topic :: View next topic |
| Author |
Message |
AdamtheWayne
Joined: 09 Jul 2018
Posts: 1182
|
 Posted: Tue Jul 10, 2018 5:04 pm Post subject: Olds 442 bodywork. Posted: Tue Jul 10, 2018 5:04 pm Post subject: Olds 442 bodywork. |
 |
|
It's currently 6:pm July 10th. I'll be back at midnight.


 |
|
| Back to top |
|
 |
AdamtheWayne
Joined: 09 Jul 2018
Posts: 1182
|
| Posted: Tue Jul 10, 2018 8:21 pm Post subject: |
|
|
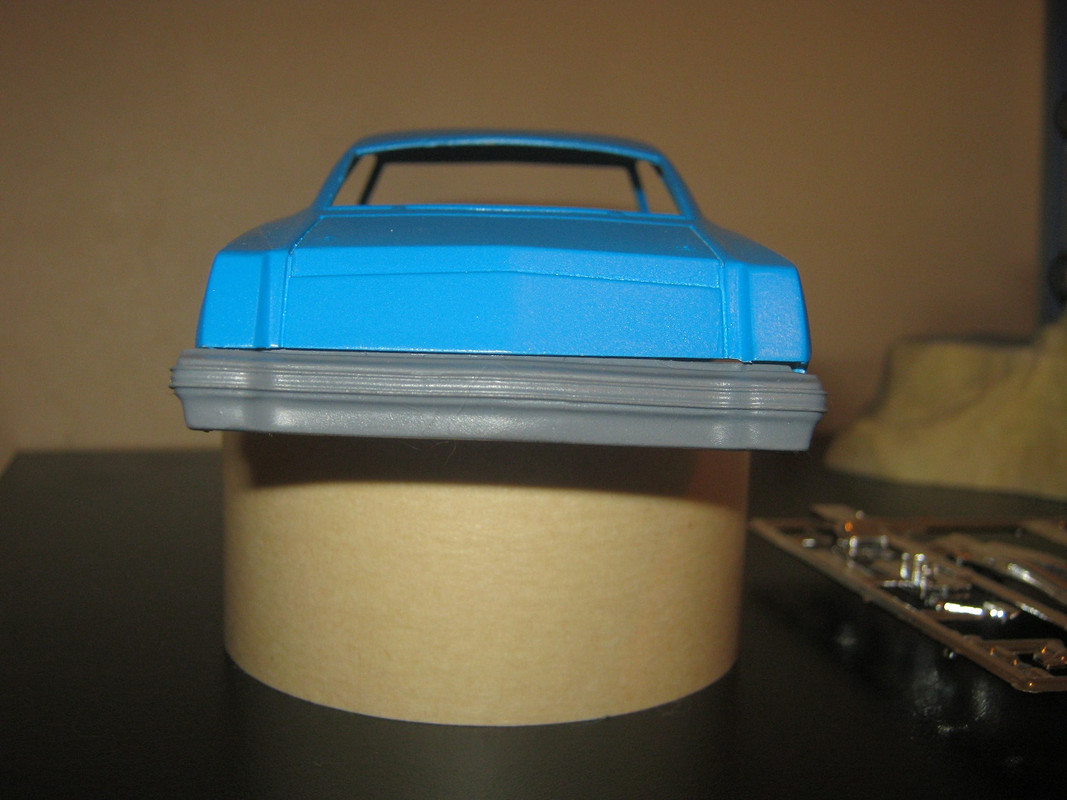
Okay, mom had a thing and called right after that first post, so I actually started at 6:30. It's now ten after nine. Here is my fix roughed in.

I started making a template for the new "sheet metal" and transferred it to some .010 sheet plastic.
I glued styrene bar stock to the fender top, around the "shoulder" at the quarter panel and back to just before the fuel filler. Next I cut my sheet to go on top of this except for at the nose. There I tucked the sheet in behind the bar stock. I filed that to a more vertical shape and trimmed the rear of the new body part to leave a small edge where the tail light blank is.


In the back I filed down the inside edge of the tail light pod to gain a more realistic width.

Up front you'll find the hood is lower than the nose panel. This will work in your favor.

Finally, there's plenty plastic in the nose to sand it into shape. The center bar should be a bit wider and the vertical portion a bit higher. I sanded a bit from the bottom cross spar to open the grille area's lower half. The top cross spar in front of the hood is as easily altered. Add some mesh for the grille, square out the headlight sockets and it's ready to paint.
 |
|
| Back to top |
|
|
DaveVan
Joined: 27 Jan 2018
Posts: 1582
|
| Posted: Tue Jul 10, 2018 8:56 pm Post subject: |
|
|
| Reminds me of the Polar Lights Charge....in many ways! |
|
| Back to top |
|
|
AdamtheWayne
Joined: 09 Jul 2018
Posts: 1182
|
| Posted: Tue Jul 10, 2018 9:15 pm Post subject: |
|
|
| DaveVan wrote: | | Reminds me of the Polar Lights Charge....in many ways! |
I know, right?  Hey, at least this one's rear window is symmetrical! Hey, at least this one's rear window is symmetrical! |
|
| Back to top |
|
|
DarylH
Joined: 19 May 2018
Posts: 77
Location: Xenia OH
|
| Posted: Wed Jul 11, 2018 8:20 am Post subject: |
|
|
| Thank you for this. Your mods really seem to help with the shape and will make a bit more sense to me when I have the kit on the bench in front of me. |
|
| Back to top |
|
|
AdamtheWayne
Joined: 09 Jul 2018
Posts: 1182
|
| Posted: Wed Jul 11, 2018 10:24 am Post subject: |
|
|
| You're welcome Daryl. |
|
| Back to top |
|
|
AdamtheWayne
Joined: 09 Jul 2018
Posts: 1182
|
| Posted: Tue Jul 17, 2018 12:36 am Post subject: |
|
|
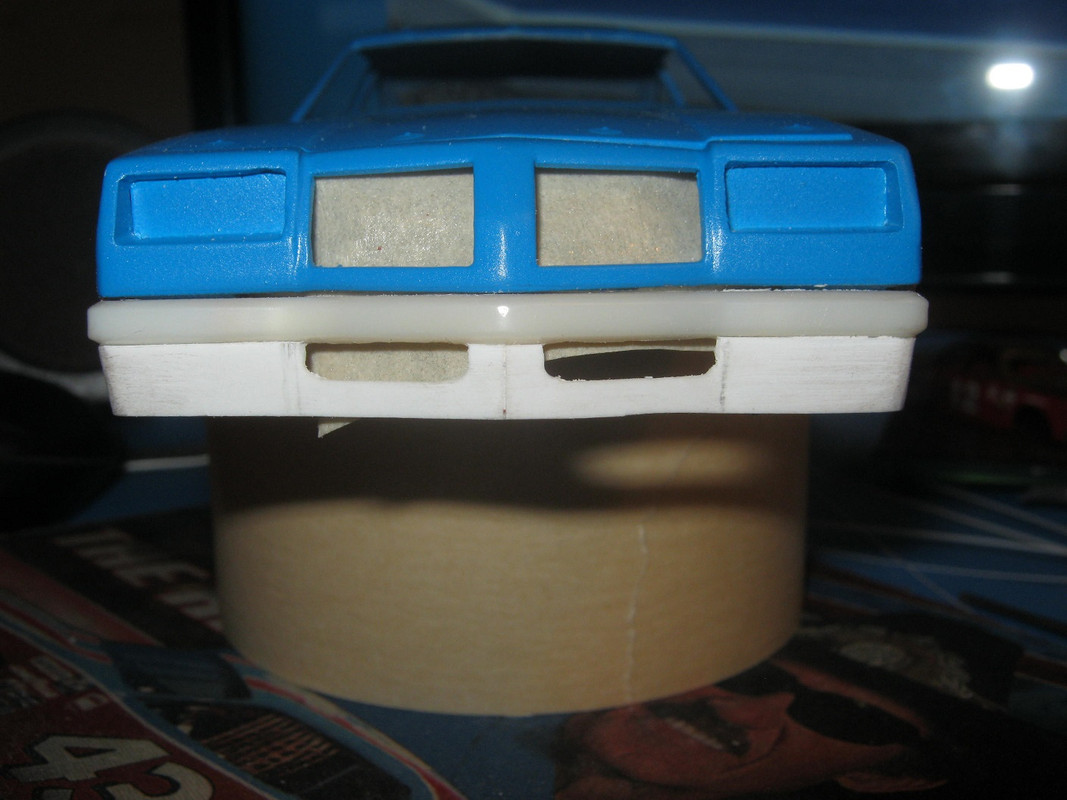
Working on the nose job at the moment. I've modified the nose on the left into the shape I want only by sanding. There's plenty to work with, although I did get a little overzealous. Next I'll widen the center piece.
 |
|
| Back to top |
|
|
AdamtheWayne
Joined: 09 Jul 2018
Posts: 1182
|
| Posted: Tue Jul 17, 2018 10:00 pm Post subject: |
|
|
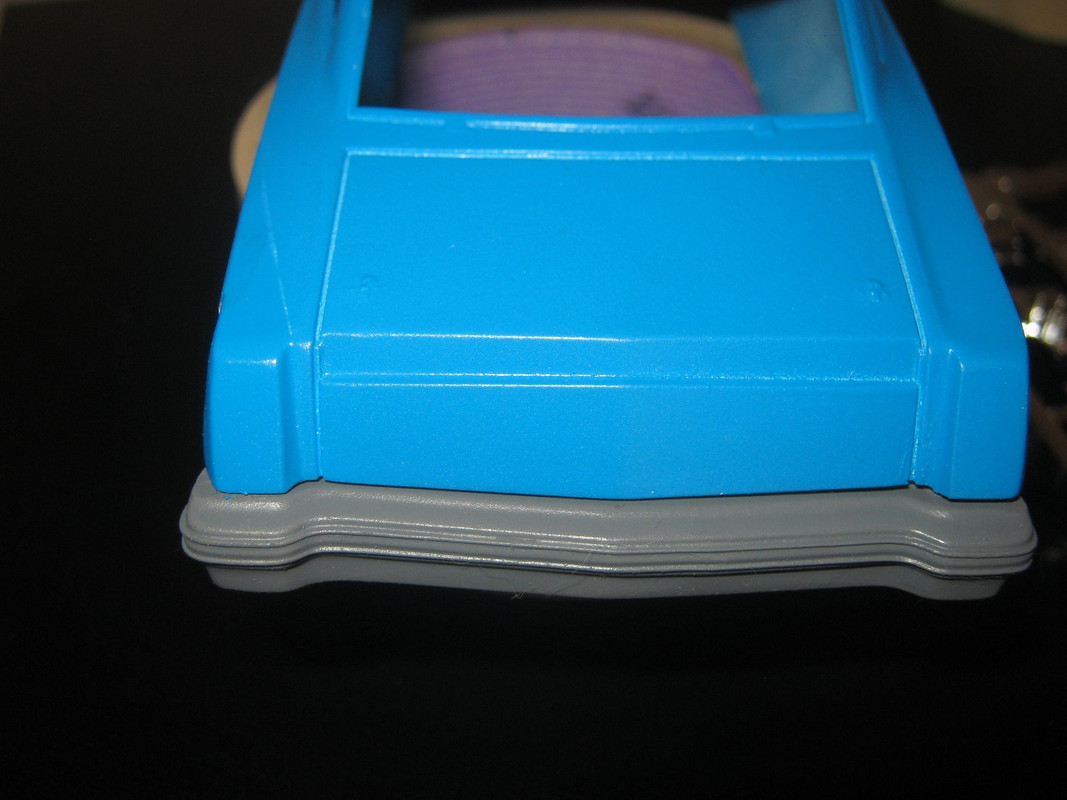
Finished roughing in the new grille. I might add a little more plastic to the outer sides of the grill socket. Not sure yet.

Here's how I did the sides. I used .030 bar stock to outline. I didn't go all the way into the quarter panel because you want to taper that in.


Next, use some 2" tape and place it's edge where you want your belt line to be.
Transfer that to some .010 sheet, matching the straight edges. Cut your top edge and test fir until it fits the way you want and the leading edge tucks in behind the bar stock at the nose.
Cut reliefs in the plastic over the wheel wells, but don't cut into the sheet that goes over the fenders. Roll the plastic down over the doors, gluing as you go. DO NOT use gap filler. Use a skim coat of Testors tube glue for styrene or super glue gel. After the skin is over the door you can work your way around the fenders. Sand to taste,\.
|
|
| Back to top |
|
|
AdamtheWayne
Joined: 09 Jul 2018
Posts: 1182
|
| Posted: Tue Jul 17, 2018 10:06 pm Post subject: |
|
|
By the way, if you try this tip to fix the body sides, cut the hole for the fuel filler BEFORE you glue the new sheet on. Don't ask me how I know! Just thank me for doing the research for you.  |
|
| Back to top |
|
|
AdamtheWayne
Joined: 09 Jul 2018
Posts: 1182
|
| Posted: Wed Jul 18, 2018 6:38 pm Post subject: |
|
|
Still needs a bit of work on the lower panels.

 |
|
| Back to top |
|
|
Matt T.
Joined: 03 Feb 2018
Posts: 114
Location: Albany, NY
|
| Posted: Fri Jul 20, 2018 5:44 pm Post subject: |
|
|
| Looking good! Well done. The nose looks SO much better with those headlight openings. |
|
| Back to top |
|
|
AdamtheWayne
Joined: 09 Jul 2018
Posts: 1182
|
| Posted: Fri Jul 20, 2018 9:50 pm Post subject: |
|
|
| Matt T. wrote: | | Looking good! Well done. The nose looks SO much better with those headlight openings. |
Thank you. I'm trying a new primer with these. It's Rustoleum "chalk". I really like it except, it's one of those wait two days before coating over it paints. URGH! Anyway I'm building roll cages now, I should be able to throw some paint at the bodies Sunday. 
There were a couple buckles in the bodywork. They were easily fixed by cutting a small slit in the middle and introducing it to gap filling glue. After getting it glued down a little feathering putty closed it up.
I did think about leaving the buckles in it. I mean, no stocker is perfectly straight anyway, especially after a long race. |
|
| Back to top |
|
|
socal76
Joined: 30 Jan 2018
Posts: 14
|
| Posted: Sat Jul 21, 2018 5:09 am Post subject: Ought to send it to a good caster for us less talented |
|
|
| Not all of us have the talent you are showing us with this tutorial! |
|
| Back to top |
|
|
AdamtheWayne
Joined: 09 Jul 2018
Posts: 1182
|
| Posted: Sat Jul 21, 2018 3:24 pm Post subject: |
|
|
Thank you SoCal!
Quick update here, both cars I tried cheap little old Krylon short cuts for the white and black. I'm actually pretty impressed for right-out-of-the-can! The white is ready for the colors and the black is smooth enough decal and clear coat right now. I think I owe it to my new primer.

 |
|
| Back to top |
|
|
AdamtheWayne
Joined: 09 Jul 2018
Posts: 1182
|
| Posted: Sun Jul 22, 2018 12:44 am Post subject: Re: Ought to send it to a good caster for us less talented |
|
|
| socal76 wrote: | | Not all of us have the talent you are showing us with this tutorial! |
Thank you very much sir. Now keep this under your helmet, I don't want everybody going nuts. I found a parts box pair of bumpers. I have a rear bumper from a Johan and a front from I don't know what, but with a little tweaking and a rubber mold, I'm going to make a few for my use. I'll make a few extra for you guys watching this thread if you like them. |
|
| Back to top |
|
|
AdamtheWayne
Joined: 09 Jul 2018
Posts: 1182
|
| Posted: Sun Jul 22, 2018 1:30 pm Post subject: |
|
|
A little test fitting. This is the correct style of bumper most teams were running on the Olds.
Those rear edges are still meter catchers, even scaled in. I'll add the sheet metal and rivets later today. front bumper is next.

 |
|
| Back to top |
|
|
AdamtheWayne
Joined: 09 Jul 2018
Posts: 1182
|
| Posted: Sun Jul 22, 2018 1:59 pm Post subject: |
|
|

 |
|
| Back to top |
|
|
Bill J

Joined: 28 Jan 2018
Posts: 393
|
| Posted: Sun Jul 22, 2018 6:36 pm Post subject: |
|
|
Very nice bodywork and fixing of the rear bumper. You should show how you fixed the bumper, your mods make it look nearly perfect.
While I am enjoying watching you fix this kit, I am not doing one myself. Way more than I have time and patience to mess with.
You could probably sell correction parts and help the guys that bought these out. Although some people seem to accept all the flaws and seem content. |
|
| Back to top |
|
|
AdamtheWayne
Joined: 09 Jul 2018
Posts: 1182
|
| Posted: Sun Jul 22, 2018 6:54 pm Post subject: |
|
|
| Bill J wrote: | Very nice bodywork and fixing of the rear bumper. You should show how you fixed the bumper, your mods make it look nearly perfect.
While I am enjoying watching you fix this kit, I am not doing one myself. Way more than I have time and patience to mess with.
You could probably sell correction parts and help the guys that bought these out. Although some people seem to accept all the flaws and seem content. |
Sir, thank you for the compliment. I really should have taken progress pics of the bumper but I was in the zone.
I do plan to make a mold of the bumpers and casting a bunch. |
|
| Back to top |
|
|
Lionpride
Joined: 28 Jan 2018
Posts: 249
|
| Posted: Mon Jul 23, 2018 6:34 am Post subject: |
|
|
Pettys very often cut the rear bumper in half, took material off and remounted with the ends flush to the fenders. No need for sheet metal covering up the edge sticking out. They did this a lot with the Monte Carlos.
Nice bumper mod Adam! |
|
| Back to top |
|
|
AdamtheWayne
Joined: 09 Jul 2018
Posts: 1182
|
| Posted: Mon Jul 23, 2018 10:42 am Post subject: |
|
|
| Lionpride wrote: | Pettys very often cut the rear bumper in half, took material off and remounted with the ends flush to the fenders. No need for sheet metal covering up the edge sticking out. They did this a lot with the Monte Carlos.
Nice bumper mod Adam! |
That is incorrect. Removal of material was illegal in NASCAR rules. Petty had his body men pound the ends inward. You can tell by the buckle in the steel at the corners.

Richard had them do this on the MAGNUM and Monte as well.
Thank you for the compliment. I was trying to rescribe the lines where I took off the bumper guards, and had something in my left eye the whole dang time!! Rinsed it twice. I decided to stop and check my progress after giving my eye a rest, and it was as you see in the picture. I stopped just in time man! |
|
| Back to top |
|
|
Tom M.
Board Moderator
Joined: 01 Feb 2018
Posts: 606
|
| Posted: Mon Jul 23, 2018 9:46 pm Post subject: |
|
|
| AdamtheWayne wrote: | | Lionpride wrote: | Pettys very often cut the rear bumper in half, took material off and remounted with the ends flush to the fenders. No need for sheet metal covering up the edge sticking out. They did this a lot with the Monte Carlos.
Nice bumper mod Adam! |
That is incorrect. Removal of material was illegal in NASCAR rules. Petty had his body men pound the ends inward. You can tell by the buckle in the steel at the corners. |
That is incorrect information. The bumpers were sectioned for width and re-shaped. I've been up close and personal to those cars when they were being raced and you could see the welds. Lots of times the seams were covered over with the shiny metal tape that sheetmetal workers used too. |
|
| Back to top |
|
|
Lionpride
Joined: 28 Jan 2018
Posts: 249
|
| Posted: Tue Jul 24, 2018 7:54 am Post subject: |
|
|


Sectioned and fitting flush. |
|
| Back to top |
|
|
AdamtheWayne
Joined: 09 Jul 2018
Posts: 1182
|
| Posted: Tue Jul 24, 2018 10:35 am Post subject: |
|
|
| Turns out we're both correct. Front bumpers had their corners pounded in, and NASCAR allowed rear bumpers to be sectioned for a flush fit. Makes me wonder why most teams opted for those awful skirts. |
|
| Back to top |
|
|
AdamtheWayne
Joined: 09 Jul 2018
Posts: 1182
|
| Posted: Tue Jul 24, 2018 11:09 am Post subject: |
|
|
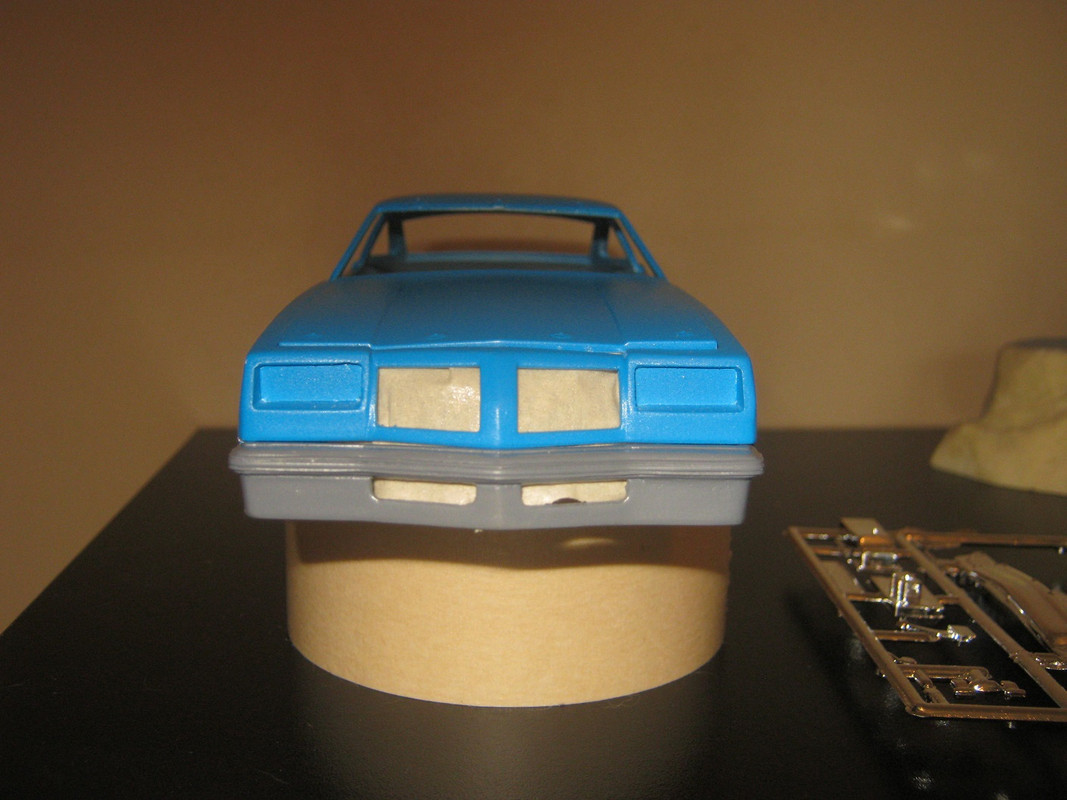
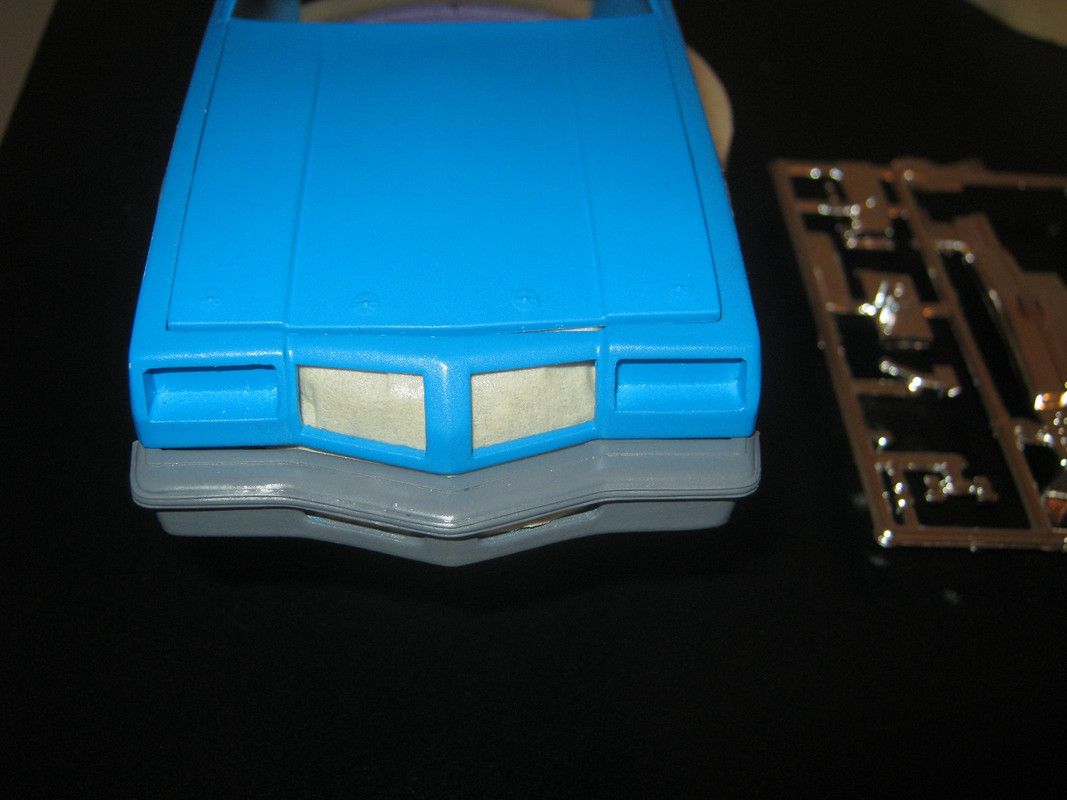
A little help if you please? Anybody recognize this bumper? It will be the basis of my front bumper. It stands way too far from the body, but my fear here is, when I cut down the ends it will be too narrow and I'll have to cut and widen it.
Either way, the plan is to shorten the ends, add the trim across the ridge, the ducts and lower half and call it a day. This will mostly be scrap plastic so... should be, fun?


Looking at these pictures close up I just know I'm going to hate this paint job. |
|
| Back to top |
|
|
Tom Birky
Joined: 01 Feb 2018
Posts: 200
Location: Eastern Iowa
|
| Posted: Tue Jul 24, 2018 11:46 am Post subject: |
|
|
Mid 70s Camaro bumper. Many of t by e 442s have a filler piece between the bumper and grille.
Tb |
|
| Back to top |
|
|
AdamtheWayne
Joined: 09 Jul 2018
Posts: 1182
|
| Posted: Tue Jul 24, 2018 11:50 am Post subject: |
|
|
| Tom Birky wrote: | Mid 70s Camaro bumper. Many of t by e 442s have a filler piece between the bumper and grille.
Tb |
THANK YOU!! That was driving right 'round the bend! I see the filler (body colored) on most of the cars. Currently trying to nail down a proper size and it looks like most of them are about one third the width of the bumper. I want to mount a thin strip of .010, just below the rear edge of the bumper, then add the body panel. This will give me the surface to wedge it in the original mounting notch of the kit, and give just a little gap to make painting and plating masking easier. |
|
| Back to top |
|
|
AdamtheWayne
Joined: 09 Jul 2018
Posts: 1182
|
| Posted: Tue Jul 24, 2018 7:18 pm Post subject: |
|
|
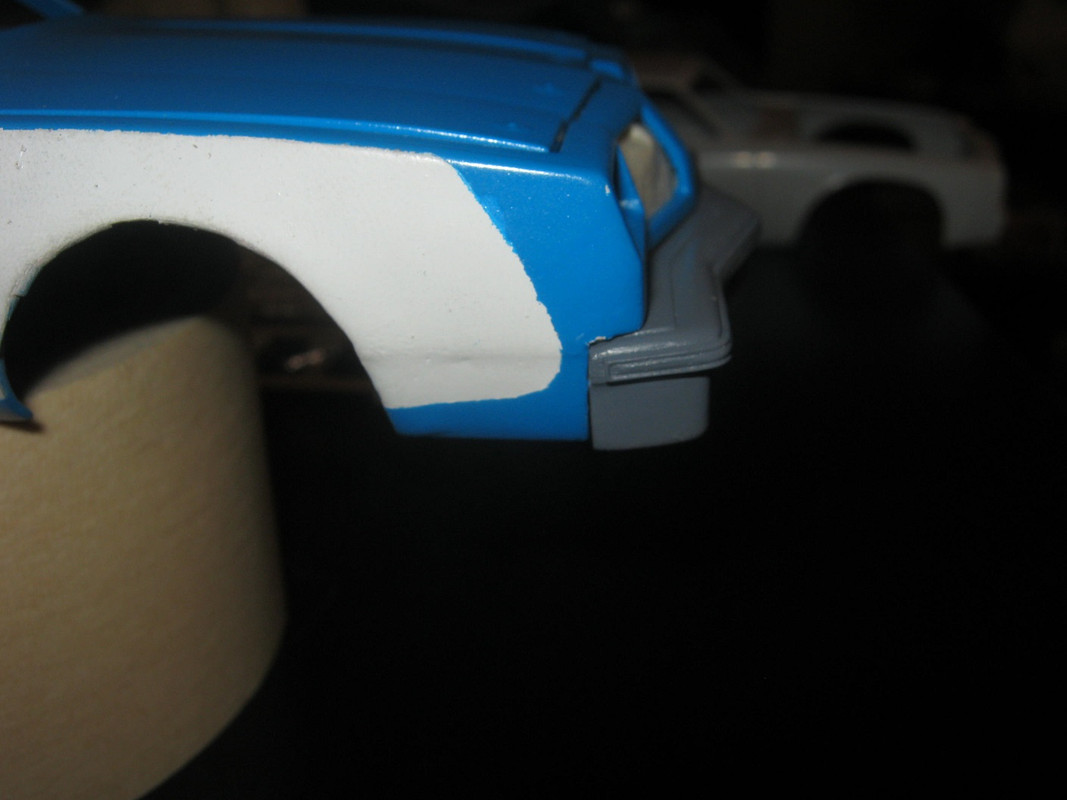
Just a little color to start.


The Petty car is going to need some wet sanding but I got good coverage. I think the new "shoulder" and nose make a huge difference. |
|
| Back to top |
|
|
octopusmotor

Joined: 19 Mar 2018
Posts: 111
|
| Posted: Tue Jul 24, 2018 7:50 pm Post subject: |
|
|
This is looking really good. Please keep the updates coming - it's valuable stuff for those of us planning future builds.
Jodie Peeler |
|
| Back to top |
|
|
AdamtheWayne
Joined: 09 Jul 2018
Posts: 1182
|
| Posted: Thu Jul 26, 2018 2:07 am Post subject: |
|
|
Here's the front bumper nearly done. I used a Camaro bumper, the outer ends of a Monogram Grand Prix, .020 thick sheet styrene and an absurd amount of super glue.


 |
|
| Back to top |
|
|
stewrtfan
Joined: 30 Jan 2018
Posts: 51
|
| Posted: Thu Jul 26, 2018 5:02 am Post subject: olds chrome |
|
|
I've tried everything I can think of to remove the chrome in this kit.
I started with good old Easy Off (used this for years), then brake fluid, then the purple stuff. Finally tried bleach and still no luck. At this point the parts have sat in the bleach tank since Monday and still looks as good as the day I put it in the tank.
By the way, Salvino's chrome looks as good as I've seen in many years.
Any other ideas??? |
|
| Back to top |
|
|
DaveVan
Joined: 27 Jan 2018
Posts: 1582
|
| Posted: Thu Jul 26, 2018 7:53 am Post subject: |
|
|
| They claim the chrome is a new process that is real chrome.....we may need a new way of removing it..... |
|
| Back to top |
|
|
AdamtheWayne
Joined: 09 Jul 2018
Posts: 1182
|
| Posted: Thu Jul 26, 2018 9:47 am Post subject: Re: olds chrome |
|
|
| stewrtfan wrote: | I've tried everything I can think of to remove the chrome in this kit.
I started with good old Easy Off (used this for years), then brake fluid, then the purple stuff. Finally tried bleach and still no luck. At this point the parts have sat in the bleach tank since Monday and still looks as good as the day I put it in the tank.
By the way, Salvino's chrome looks as good as I've seen in many years.
Any other ideas??? |
I tried to tell everyone it wouldn't strip. I tried to tell Salvinos NOT to do it. Yes, the chrome is actual plating and will not strip. As for new and exciting ways to strip... I'm out of ideas. |
|
| Back to top |
|
|
Bill J
Joined: 28 Jan 2018
Posts: 393
|
| Posted: Thu Jul 26, 2018 11:16 am Post subject: |
|
|
Just think, if they would have made the bumpers correct in the kit, no stripping would be required. Novel concept.
Last edited by Bill J on Thu Jul 26, 2018 6:01 pm; edited 1 time in total |
|
| Back to top |
|
|
AdamtheWayne
Joined: 09 Jul 2018
Posts: 1182
|
| Posted: Thu Jul 26, 2018 11:22 am Post subject: |
|
|
| Bill J wrote: | | Just think, if they would have made the bumpers correct in the kit, no stripping would be required. Navel concept. |
A "navel" concept is an idea for an anti lint device. I think you mean "novel" (just messing with you, I'm guessing you posted with auto correct on?) Either way, you're spot on. Look, I don't own a kit company, I'm just a freelance pattern maker. But the reason this stuff goes together for me so easily is because of two things. Visualization and patience! PATIENCE being the key. Salvinos is a good kit, but it could have been great had it not been rushed. |
|
| Back to top |
|
|
Tom Birky
Joined: 01 Feb 2018
Posts: 200
Location: Eastern Iowa
|
| Posted: Thu Jul 26, 2018 1:58 pm Post subject: |
|
|
| Are you going to take a little off the bottom of the front bumper Adam? As for the chrome, yes seems to be the real thing. I scraped and scraped on the chrome tree, pretty sure it looked like a copper base under it. Short of grinding and repainting with alclad I dont see a way to remove it. I wanted to try and section the bumper so it wasn't so wide, now I dont know if I can refinish it in an acceptable manner. Tb |
|
| Back to top |
|
|
AdamtheWayne
Joined: 09 Jul 2018
Posts: 1182
|
| Posted: Thu Jul 26, 2018 2:07 pm Post subject: |
|
|
| Tom Birky wrote: | | Are you going to take a little off the bottom of the front bumper Adam? As for the chrome, yes seems to be the real thing. I scraped and scraped on the chrome tree, pretty sure it looked like a copper base under it. Short of grinding and repainting with alclad I dont see a way to remove it. I wanted to try and section the bumper so it wasn't so wide, now I dont know if I can refinish it in an acceptable manner. Tb |
Yes. It's by no means done, but I was taking pictures at two in the morning and was kinda done for the day. |
|
| Back to top |
|
|
socal76
Joined: 30 Jan 2018
Posts: 14
|
| Posted: Fri Jul 27, 2018 5:52 am Post subject: |
|
|
| Maybe try Scalecoat II paint remover. I don't have the kit in the project stack yet. Doing some Muscle Cars right now. Still have 8 in the pile. Get tired of one or it needs time for glue to dry for a longer time, pull another of the stack and do things needed until I get to the point I stopped with the first one usually get to the fourth or fifth before i go back to the first kit. Almost all are at the point of needing paint on the body, interior, and chassis. Still need to get better on more visible parts! Not enough practice (painting phobia!). |
|
| Back to top |
|
|
Tom Birky
Joined: 01 Feb 2018
Posts: 200
Location: Eastern Iowa
|
| Posted: Fri Jul 27, 2018 10:39 am Post subject: |
|
|
Salvinos has stated it's real chrome. I ground some off the parts tree with a file. There is the chrome, a copper base and then plastic. Sanding sticks will barely scratch it. I think the only way to remove it other than grinding would be a reverse electroplating process. Probably not feasible. I doubt any stripper will touch it. If you drop a bumper on the floor vs a plastic one, you'll hear the metallic sound.
Last edited by Tom Birky on Sat Jul 28, 2018 10:26 pm; edited 1 time in total |
|
| Back to top |
|
|
Lionpride
Joined: 28 Jan 2018
Posts: 249
|
| Posted: Fri Jul 27, 2018 3:08 pm Post subject: |
|
|
| Sounds expensive. |
|
| Back to top |
|
|
AdamtheWayne
Joined: 09 Jul 2018
Posts: 1182
|
| Posted: Sat Jul 28, 2018 9:37 pm Post subject: |
|
|
Welp, I wanted to update this and the MAGNUM thread, but for some reason IMGUR isn't responding.
Either way, I got the body panel in place and smoothed in and the rest of the panels backed up with thicker plastic. I'll add the trim beads and be done with the bumper tonight. I'll pour a mold tomorrow some time and make a few sets. |
|
| Back to top |
|
|
AdamtheWayne
Joined: 09 Jul 2018
Posts: 1182
|
| Posted: Wed Aug 01, 2018 6:07 pm Post subject: |
|
|
| Quickie update: I'm re doing the trim on the front bumper. Since they're on opposing ends of the car, not many people would notice the size difference in trim, but I would. Simple operation, I'll have it done later tonight and a new photo hosting site shortly after! |
|
| Back to top |
|
|
Tom Birky
Joined: 01 Feb 2018
Posts: 200
Location: Eastern Iowa
|
| Posted: Wed Aug 01, 2018 9:34 pm Post subject: |
|
|
Go Adam Go!! Can't wait to see how it turns out.
tb |
|
| Back to top |
|
|
AdamtheWayne
Joined: 09 Jul 2018
Posts: 1182
|
| Posted: Thu Aug 02, 2018 4:59 pm Post subject: |
|
|
Testing...
 |
|
| Back to top |
|
|
AdamtheWayne
Joined: 09 Jul 2018
Posts: 1182
|
| Posted: Thu Aug 02, 2018 5:27 pm Post subject: |
|
|
Like I said, the front just didn't match the back and, this dude did not abide!
They're rough right now, but they'll clean up nicely. I'll get them cleaned up and molded, then pop out a couple sets and plate them.
 |
|
| Back to top |
|
|
AdamtheWayne
Joined: 09 Jul 2018
Posts: 1182
|
| Posted: Thu Aug 02, 2018 5:30 pm Post subject: |
|
|
| No matter how I tried to massage it, this thing still has the biggest chin ever in NASCAR! |
|
| Back to top |
|
|
Tom Birky
Joined: 01 Feb 2018
Posts: 200
Location: Eastern Iowa
|
| Posted: Thu Aug 02, 2018 7:45 pm Post subject: |
|
|
That's pretty darn good looking! I do some scratch building, but nothing like that. Well done.
Tb |
|
| Back to top |
|
|
AdamtheWayne
Joined: 09 Jul 2018
Posts: 1182
|
| Posted: Fri Aug 03, 2018 12:01 am Post subject: |
|
|
| Tom Birky wrote: | That's pretty darn good looking! I do some scratch building, but nothing like that. Well done.
Tb |
Thank you. The trick is getting the CAT HAIR(!!) just right. |
|
| Back to top |
|
|
joe b
Joined: 31 Jan 2018
Posts: 209
Location: New Jersey
|
| Posted: Thu Aug 09, 2018 7:20 am Post subject: |
|
|
| Lionpride wrote: |
Sectioned and fitting flush. |
yes you can see in the middle where the cut was made in all these pictures |
|
| Back to top |
|
|
joe b
Joined: 31 Jan 2018
Posts: 209
Location: New Jersey
|
| Posted: Thu Aug 09, 2018 7:48 am Post subject: |
|
|
| AdamtheWayne wrote: | Finished roughing in the new grille. I might add a little more plastic to the outer sides of the grill socket. Not sure yet.
Here's how I did the sides. I used .030 bar stock to outline. I didn't go all the way into the quarter panel because you want to taper that in.
Next, use some 2" tape and place it's edge where you want your belt line to be.
Transfer that to some .010 sheet, matching the straight edges. Cut your top edge and test fir until it fits the way you want and the leading edge tucks in behind the bar stock at the nose.
Cut reliefs in the plastic over the wheel wells, but don't cut into the sheet that goes over the fenders. Roll the plastic down over the doors, gluing as you go. DO NOT use gap filler. Use a skim coat of Testors tube glue for styrene or super glue gel. After the skin is over the door you can work your way around the fenders. Sand to taste,\.
|
adam could you go into a little more detail on how you finished the front fenders here? it looks like once you cleared the door you ran the strip up on top of the fender and down the front of the bumper. that would cause a ridge on the hood side of the fender. did you putty up the top of the fender to the height of the strip or was there a ridge running along the front fender with a valley between the ridge and the hood? you have any photos of this process, not too familiar with this body.
also are you going to cast these bumpers for sale?
thanks, joe |
|
| Back to top |
|
|
|

