 |
Randy Ayers Nascar Modeling Forums
|
| View previous topic :: View next topic |
| Author |
Message |
AdamtheWayne
Joined: 09 Jul 2018
Posts: 1182
|
 Posted: Thu May 07, 2020 2:56 pm Post subject: 2+2 My initial review Posted: Thu May 07, 2020 2:56 pm Post subject: 2+2 My initial review |
 |
|
I just got my Richard Petty 2+2, I've taken a view, now here's my review.
(I PROMISE not to do that the whole time! My sincerest apologies to the estate of Theodore Giesel)
First thing I noticed, out of the box... NO CHROME! Aside from a few drivers keeping the bumper trim, and a couple running chrome wheels, these cars had none. Gotta be honest, was a lit-tle bit relieved! I'm going to forgo any review of the chassis and components simply because all I can say is, Monogram GM Chassis, Salvinos choice plastic, ZERO flash.
I had seen a couple posts about the greenhouse and it concerned me because, this was not what I knew of the kit. The pre-production sample I had was not only uber shiny, it was for the most part carbon copy of the original kit, except it had the humpback. It did not at that time have the inside shelf, and guys... that's on me. During one of our lengthy conversations I mentioned that Petty and a couple others had that shelf, some did not. I actually didn't expect it to get into the kit but, I also expected if it did, it would be a separate part. During that same call, we discussed the trunk lines and, I swear to you guys, they were there. Don't know what happened between then and the mold cutting.

This photo doesn't show it well but, one thing I'm personally unhappy with is the swirl and mold marks in the plastic. You can almost see the seam running down the center of the roof. You can't feel them, but you can see them, lying in wait to show up in the paint! Other than that, as far as the greenhouse goes, I have been over every 25th scale inch with my little ruler there. With one minor and one necessary change, no greenhouses were harmed in the making of this model. And I tried fellas, I REALLY tried to find something off!
When Jim and I first started discussing these cars I made sure he knew, most of them were re-skinned, older cars to begin with. All he needed to do, to make the community happy was to add the proper nose, and mod the deck lid. Everything else could stay the same. In short, all my comparison bears out, that's what he did. I tried swapping all the parts, hoods, windows, clips. The only thing fussy was trying to swap the nose clips.
As for the nose clip...
It's very nice, very smooth and when built (as we have seen) captures the look of the car quite well... but I'm a rivet counter. The bumper guards are a tad too high on the 2+2 nose, it's a little more convex than it needs to be in spots and there's missing trim strips.

The slight forward bow of the grille area is nothing big to complain about, just a little thing I noticed. By '87 most of the teams had stopped bothering to replace the little chrome strips on the noses and this can be replicated with a strip of Bare Metal Foil anyway, so no real loss. The part I take exception to is the lower half being too smooth and toy like but, it's a small area, bottom of the car so not too many will notice this either. Most guys will find though, taking down those guards a little across the top will make the nose look way better.
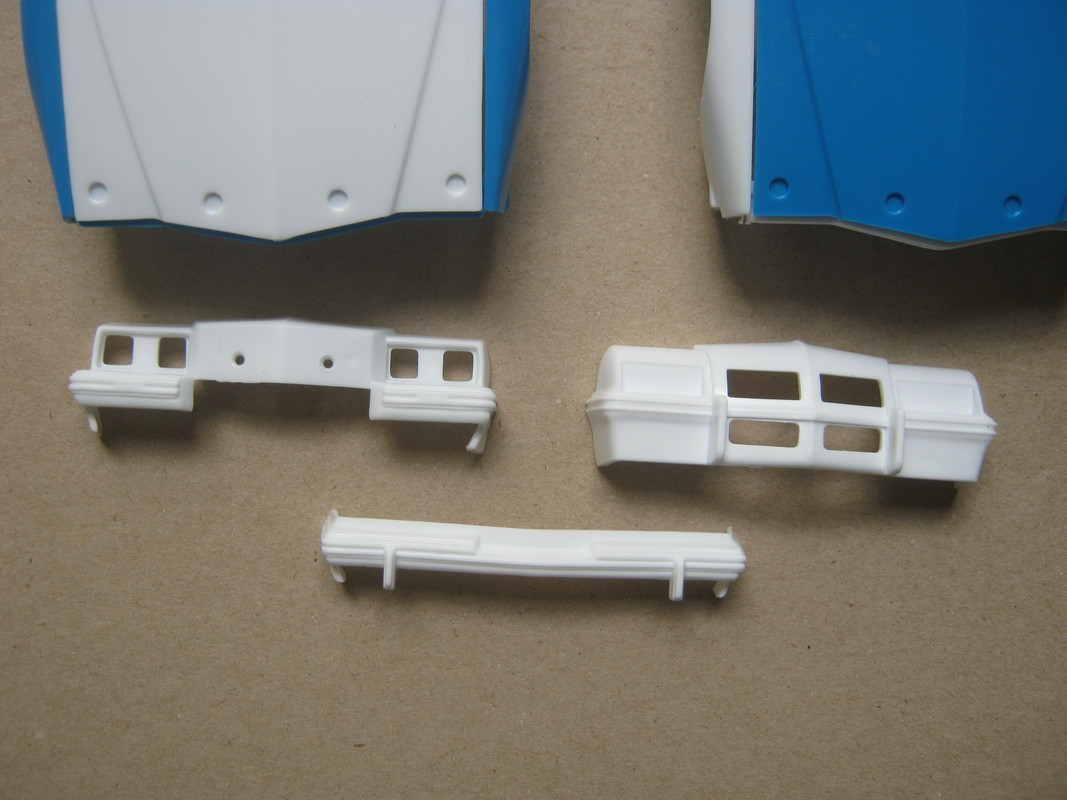
Finally, The rear quarters. (Sigh).

Again... those trunk lines were there, I swear!
Aside from that lacking detail, at least now I can see what's being said about the rear bumper. The trunk skirt doesn't quite line up. This is because the fender edge was inexplicably moved one scale inch forward, leaving a gap where the bumper ears attach to the quarter panel. One can either A: Add strip to those leading edges and file to shape OR 2: Add 1mm if strip to the edge of the bumper where it mates to the skirt.
For those of you unfamiliar with scribing, I urge you to check out a couple YT videos. This plastic sands and scribes like a dream so fixing those trunk lines shouldn't be a hassle.
Overall I'm quite happy about the kit. I felt all along the headlight plates should be separate parts and the nose should have them molded open. But if you open them up, either the Monte Carlo or Grand Prix plates will work for added detail. I do not recommend putting them on without opening the backs though. So what we have it essentially what we asked for. A Monogram Grand Prix with a 2+2 body.
On a final note... the rear window. If you ignore the sharp curvature of the transition, it's a work of art. To give it a little more clarity and hide that sharp line, I recommend a dip in futureshine. It will be so clear, you'll have to look for that edge. (At least that's how I've got it worked out in my head and it's fragile so...)
_________________
"Dude, it's not Camelot... it's only a model." "Details man, I need details!!" |
|
| Back to top |
|
 |
Rob Spires
Board Moderator
Joined: 27 Jan 2018
Posts: 185
|
| Posted: Thu May 07, 2020 3:15 pm Post subject: |
|
|
Thanks for the comprehensive review. I was just comparing mine to the older Monogram kit yesterday and didnt see any major differences in dimensions.
One area that needs the slightest bit of attention are the dimples on the front quarterpanels. The contingencies will likely hide them untouched, but with the minor bit of effort puttying them would be, I think it is worth it.
In dry-fitting, Ive seen the buck toothed look of the rear bumper, but Ive also seen that the actual car had a bit of overhang in that area too. So while it may not have been as pronounced as the kit, I dont think its totally out of the ballpark.
As I said in another thread, the few issues that this kit has are no worse than several of the original issue Monogram kits. I will second the quality of the styrene too. It does give it the feel of a high-end kit even if the guts of the kit match a dozen others I already have in my collection. |
|
| Back to top |
|
|
Orangeastre
Joined: 29 Jan 2018
Posts: 212
|
| Posted: Thu May 07, 2020 4:25 pm Post subject: |
|
|
| Did you put your micrometer on the roof casting thickness by any chance. I have a hunch.. |
|
| Back to top |
|
|
AdamtheWayne
Joined: 09 Jul 2018
Posts: 1182
|
| Posted: Thu May 07, 2020 6:29 pm Post subject: |
|
|
| Orangeastre wrote: | | Did you put your micrometer on the roof casting thickness by any chance. I have a hunch.. |
I did not. Last I saw of them the wife was using them to try and crack one of those nuts that looks like a petrified orange slice. 
_________________
"Dude, it's not Camelot... it's only a model." "Details man, I need details!!" |
|
| Back to top |
|
|
Steve Salhany
Joined: 30 Jan 2018
Posts: 151
|
|
| Back to top |
|
|
Steve Salhany
Joined: 30 Jan 2018
Posts: 151
|
| Posted: Fri May 08, 2020 8:34 am Post subject: |
|
|
I agree with most of your take BTW. It's a good kit overall. The rear glass is an incredible piece of engineering, it looks and fits fantastically.
I did a few to lower the body a bit: I moved the rear bumper back and cut those round posts off of the inside of it, I sanded down the top of the rollcage a bit, I cut out the window net from the chassis and attached it directly to the body, and instead of slotting the front chassis tabs inside the holes provided I moved them above them. All of these things are VERY easy to do, and help the model look realistic. The quality of the casting gives the model I very good weight too, I'm very pleased.
My .02. |
|
| Back to top |
|
|
james220
Joined: 29 Jan 2018
Posts: 162
Location: Roanoke VA
|
| Posted: Fri May 08, 2020 10:52 am Post subject: |
|
|
| Steve when you moved the bumper back did you need to fill in the sides where the bumpers hit the side of the car. I moved the whole piece back and need to fill that gap. |
|
| Back to top |
|
|
Steve Salhany
Joined: 30 Jan 2018
Posts: 151
|
| Posted: Fri May 08, 2020 11:42 am Post subject: |
|
|
| Yes I did. Per Tom Mooty's suggestion I took a little bit of the original Grand Prix front bumper (included in the 2+2) kit, fit it into the gap, then puttied, sanded and primed. |
|
| Back to top |
|
|
Tom M.
Board Moderator
Joined: 01 Feb 2018
Posts: 602
|
| Posted: Fri May 08, 2020 5:54 pm Post subject: |
|
|
| Orangeastre wrote: | | Did you put your micrometer on the roof casting thickness by any chance. I have a hunch.. |
I did. The inside of the roof in the vicinity of the main cage hoop is .040" closer to the bottom edge of the rocker panels on the 2+2 body as compared to the '98 reissue of the original Petty Grand Prix. |
|
| Back to top |
|
|
Orangeastre
Joined: 29 Jan 2018
Posts: 212
|
| Posted: Fri May 08, 2020 6:35 pm Post subject: |
|
|
| I would love to get my hands on a damaged body so I could see how much material could be removed from the roof. I rubbed on my Kodiak build a bit, didnt want to get greedy and end up with t-top car. |
|
| Back to top |
|
|
Tom Birky
Joined: 01 Feb 2018
Posts: 199
Location: Eastern Iowa
|
| Posted: Fri May 08, 2020 7:08 pm Post subject: |
|
|
| When grinding clearance for cages etc, I go slow with my moto tool, and hold the body up to a bright light to see how thin it's getting. Works good! |
|
| Back to top |
|
|
Tom M.
Board Moderator
Joined: 01 Feb 2018
Posts: 602
|
| Posted: Fri May 08, 2020 7:11 pm Post subject: |
|
|
| Orangeastre wrote: | | I would love to get my hands on a damaged body so I could see how much material could be removed from the roof. I rubbed on my Kodiak build a bit, didnt want to get greedy and end up with t-top car. |
It's pretty thin. |
|
| Back to top |
|
|
lanny haas

Joined: 05 Mar 2018
Posts: 26
|
| Posted: Sun May 10, 2020 11:43 pm Post subject: |
|
|
| that's why I changed out the roof om mine used the GP body roof, on the kit roof the upper window trim is above the roof line. and too flat.....maybe the roll cage will fit better... |
|
| Back to top |
|
|
BrianP
Joined: 28 Jan 2018
Posts: 67
|
| Posted: Mon May 11, 2020 5:58 am Post subject: |
|
|
The round posts on the inside of the rear bumper seem to be mistakes by the molding company. They were ejector pin spots on the original Monogram kit, but they look like plastic was allowed to flow into them on the Salvinos 1983 Petty kit (I dont have a 2+2 kit yet), so cutting those off allows the car to sit on the chassis as originally designed.
The one thing I noticed on the 2+2 is that Salvinos left the rear bumper guards on the kit piece. The Petty Pontiacs from 1982-1987 never had those, and I assumed that most teams had followed suit by the 2+2 years. Thats not a big deal, its just a time consuming detail. |
|
| Back to top |
|
|
lanny haas
Joined: 05 Mar 2018
Posts: 26
|
| Posted: Mon May 11, 2020 9:28 am Post subject: |
|
|
 |
|
| Back to top |
|
|
joe b
Joined: 31 Jan 2018
Posts: 209
Location: New Jersey
|
| Posted: Wed May 27, 2020 12:07 am Post subject: |
|
|
| BrianP wrote: | The round posts on the inside of the rear bumper seem to be mistakes by the molding company. They were ejector pin spots on the original Monogram kit, but they look like plastic was allowed to flow into them on the Salvinos 1983 Petty kit (I dont have a 2+2 kit yet), so cutting those off allows the car to sit on the chassis as originally designed.
The one thing I noticed on the 2+2 is that Salvinos left the rear bumper guards on the kit piece. The Petty Pontiacs from 1982-1987 never had those, and I assumed that most teams had followed suit by the 2+2 years. Thats not a big deal, its just a time consuming detail. |
yes your right brian. it is not a big deal but like adam, i'm a bean counter and to me that is a lack of attention to detail, and it annoys the heck out of me that they can screw up a sure thing. another example- can someone tell me why the roll cage sits lower in the body compared to the original kit? why did they mess with the green house?
_________________
Joined Jan 30, 2008
Over 2000 posts |
|
| Back to top |
|
|
|
|
You cannot post new topics in this forum
You cannot reply to topics in this forum
You cannot edit your posts in this forum
You cannot delete your posts in this forum
You cannot vote in polls in this forum
|
Powered by phpBB © 2001, 2005 phpBB Group
|

